I'm going to back up to Part 3 for a minute. While we were building rafters to support the roof tin we also framed out the upstairs loft walls.
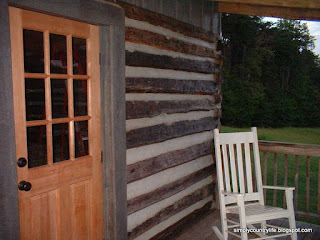
Here's a view from the inside downstairs looking out of the front door.
At this point, I was beginning to have my "moments". I didn't think we would ever get finished with this project. I did not sign up for this. I really wanted my beach life back. Playing in the ocean seemed so much more enticing than spending another weekend in the blistering sun or freezing cold with a hammer and a saw. As discouragement was setting in, my husband shows up with a pair of rocking chairs for the front porch. WHY? Why rocking chairs and why now? If only they were beach chairs. He did have a reason. He sat me down in one of the chairs and had me envision what it would be like to be sitting here, one day, when the construction was complete. I guess it helped a little, if I closed my eyes really tight.
Enough dreaming, back to measuring and cutting.
We had purchased old windows that we refurbished for use in the cabin and needed to cut openings to fit two smaller windows on both sides of the chimney upstairs along with a larger window for the opposite wall upstairs. We also needed to cut four openings downstairs in the log walls to fit two windows on each side of the cabin. Once the openings were cut out we framed them in 2x6 lumber and hung the old windows. We also framed the openings for the front and back doors with 2x6 lumber and installed both doors.
This is the part with the missing pictures, so here are a couple that you can see the front and back doors in, however, the chinking in between the logs is already done in these pics and we haven't really done it yet.
Now we were able to start closing in the upstairs walls with really heavy, thick plywood and then we proceeded to cut battons to add some character to the plywood walls. Then we went on a hunt for a stain that would closely match the log color and were not successful at finding any, so we mix our own blend of three different colors to achieve what we thought was a pretty good match. We painted the plywood and battons with our stain blend with a couple of coats to make sure it was sealed and protected.
Maybe you can pretend that the chinking isn't completed in the above picture also, because I do not have pics of these steps. Although I probably should have. My husband, who is deathly afraid of heights and myself trying to balance large sheets of plywood on ladders with hammers. I bet it was a sight:)
The next step to close the cabin in is the chinking and I will share that with you next time.
Thanks again for following along. I hope you have a great weekend and remember, if you get discouraged in the midst of a huge undertaking, stop and daydream a little about the end result of your hard work. It actually does help to picture it complete and imagine the sense of accomplishment you will feel then:)
Sometimes it helps to look back at where you started to see just how far you've come. If you'd like to look back to where we started go to Part 1.
'til next time
Adina


it is looking great! it is easy to get frustrated, but for sure it is worth the wait and so rewarding. while on a smaller scale i know the feeling. my husband and i bought a fixer-uper in 1998... we just finished the living room remodel in december! many years of "by this time next year it will be done" and 3 babies later.... it is lovely, and now i will lay on the floor in there and look up and the ceiling that no longer has areas of 1" gaps where i would see insulation and spider webs in the attic... all i see is our beautiful work and it is indeed worth the wait. good luck and enjoy your rocking chairs :)
ReplyDeleteWow, I am impressed. It is going to be great. Hang in there; it looks you are making great progress. :)
ReplyDeleteHi there! This post couldn't be written any better! Reading this post reminds me of my old room mate! He always kept chatting about this. I will forward this article to him. Pretty sure he will have a good read. Thanks for sharing! metal wall art wholesale
ReplyDelete