

Showing posts with label before after. Show all posts
Showing posts with label before after. Show all posts
Thursday, June 19, 2014
Dirty White Cabinet gets a Fresh New Farmhouse Look
Tuesday, September 3, 2013
An Old Handmade Medicine Cabinet Gets a Little First Aid
It was speaking to me. I loved it. I loved the fact that it was handmade. I loved the fact that even though it had a couple of coats of paint, the inside was left natural. I loved the fact that it had history.
This old medicine cabinet was a barn find during a recent trip to Pennsylvania. I'm not even sure the owners knew they still had it. When I pulled it out from under a table and asked them how much they were asking for the piece they looked very confused. Maybe they were just wonderring why I wanted it. It was $1. SCORE!!!! Here it is, in all it's painted up dirty glory.


This old medicine cabinet was a barn find during a recent trip to Pennsylvania. I'm not even sure the owners knew they still had it. When I pulled it out from under a table and asked them how much they were asking for the piece they looked very confused. Maybe they were just wonderring why I wanted it. It was $1. SCORE!!!! Here it is, in all it's painted up dirty glory.

The first layer of paint was turquoise and then a second layer of a pinkish peach paint covered that and then add some dirt and spider webs.

Check out the inside. Never painted! The back is made from old tongue and groove beadboard.

My husband was with me when I spotted this and I think even he wasn't sure what I would do with it, but I had a plan.
First things first, the cabinet received a good scrubbing. Then I proceeded to remove the old hinges.

Unfortunately, they had a couple layers of paint on them also and were a bit of a challenge to remove. Eventually I was able to get them off. Then I soaked them in paint remover. I wanted to reuse them and was hoping they would have an aged look after the paint was gone.
With the hinges removed, I was able to separate the door and the main part of the cabinet. The next step was to give both pieces a good sanding, then I could proceed with my vision.
I painted the edges of both pieces black.

I did this in hopes that when I painted the entire piece white and distressed it, the black edges would show. It kindof worked.

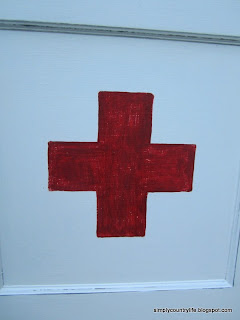
It took three coats of white paint to get good, even coverage everywhere. Once both pieces were painted and lightly distressed I designed a first aid cross in the center of the door...

...and painted it red.

This took about four coats of red paint to get a solid colored cross. I distressed the cross a little too.

Now, onto the main part of the cabinet. First, I cleaned it again and then gave it a coat of danish oil to help protect the natural wood.

Back to the old hinges. After removing them from the paint remover and rinsing them really well, I used a wire brush and was able to remove all of the paint from them and the screws. They looked aged and I was thrilled that I was going to be able to use the original hinges again.

I screwed the new, old hinges to the cabinet and the door. Once it was put back together I sealed the outside of the cabinet with a protective clear matte sealer.
Here it is, after a little "first aid" :)


I'm more in love now. My husband was even a little impressed with the transformation. If only I could show the original owners in Pennsylvania. I think they'd be pleased that their cabinet has found a new life. What do you think?
'til next time,
Adina
Linking to:
Thursday, August 1, 2013
Shabby French Grains Bread Box Makeover
This old bread box seemed to be calling to me at a flea market.
It is handmade, has nice details and is large and sturdy.


I know it isn't much to look at, although the bears are kindof cute, right?
I couldn't wait to get this home and start a makeover. I had the perfect image in mind to use on it.

This image came from a great online image resource, www.TheGraphicsFairy.com. Karen has so many fabulous images and ideas on her website. This particular one can be found HERE. This image has already been reversed backwards so that it will transfer the right way.
Back to the breadbox. I removed the hardware, the knob, the bear appliques and the backing first. Gave it a good cleaning and sanding before painting it.

Once it was painted, I gave it a light distressing.
Now it was time to get the image onto the front of the bread box door. This process was a first for me. I have seen numerous methods to use to do this, found HERE. I decided I would try the mod podge transfer method. This method was a fail for me.

I guess I wasn't patient enough. I think I rubbed the image too hard or too quickly, because I removed more of the image than I wanted to.
Take 2 - I sanded the door of the breadbox back to the wood and repainted it so I could try again using another method. This time I tried the wax/freezer paper method.


I cut a piece of wax paper to fit onto a piece of copy paper. I taped it onto the copy paper with double sided tape, with the shiny side up. Then I printed my reversed image onto the shiny side of the wax paper. I did not have any problems with this process at all. Just be very careful when you remove the paper from the printer because the ink will be wet and will smudge easily. The next step was to place the paper image side down on the bread box door exactly where I wanted it. It can't be moved around, again, you'll smudge the image. Using the back of a spoon, I rubbed over the entire image thoroughly to make sure it transferred to the door. I was truthfully shocked that it had worked! This method was super easy to do and it worked like a charm.


Once the image was on the door, I reattached the knob and gave the whole piece a clear protective finish. Then I reattached the original hinges. I liked them and thought they worked well with the entire piece. I had to cut out a new piece of wood for the backing because the old backing wasn't in very good condition. This is a really thin piece of wood that I already had and I reused the original tack nails to secure it on with.


That's it, the makeover is finished and I love how it turned out.


What do you think?
Have you ever tried to transfer an image to wood and if so what method did you use?
I have a few more image transfer projects in mind.
'til next time,
Adina
Linking to
Snazzy Little Things
Snazzy Little Things


Tuesday, July 23, 2013
Don't Throw that Away - Furniture Salvage Upcycled into a Coat Rack
You gotta love other peoples trash!
This piece of furniture salvage was going to be discarded because most of the ornate wood carvings were broken and had fallen off of it. I loved the shape of it and was more than happy to save it from the burn pile.

This is a picture after I had removed the broken trim pieces and had cleaned it up and sanded it. I was able to keep the trim piece in the top center. I like that it adds a little something to it.

Once this was sanded, I painted it a creamy off-white color, distressed the edges a little and gave it a clear matte finish.


Originally I was thinking I wanted to make this piece into a sign that said ANTIQUES on it, but then I changed my mind. Coat rack kept coming to mind now. The next step was to visit a Hobby Lobby to see if they had any hooks that caught my eye and they did! I grab 4 of these brass hooks while they were on 50% off and also purchased a package of brass screws to attach them with.


Attaching the hooks was trickier than it would seem. A five minute task turned into a half an hour task. Two of the screws did not want to screw in. I'm guessing it was because the wood might have had a knot where I was trying to screw them in at. I had to predrill small holes in order to get the screws to go in. Then the head of one of the screws broke off while screwing it in. Now I had to figure out how to remove a broken screw that was sharp and sticking out of the wood. Needlenose pliers eventually did the job of removing the broken screw. Finally, all four hooks were securely attached and the coat rack was finished!


I'm always looking at things with a creative eye to see what I can turn it into.
I love how this piece turned out, but I don't have the room for it in our little log cabin so it's going in my Etsy shop.
I'm off to start another project!
'til next time,
Adina
Linking to
Friday, February 17, 2012
Old Window Frame
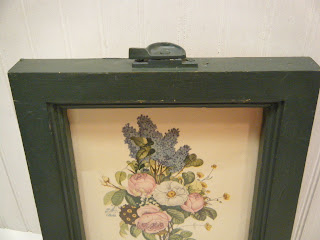
I love old windows and fell in love with this little one when I found it a few months ago. I had visions of it painted a chippy white with the dark green peeking through in spots with a vintagey, is that a word - vintagey, print of a bird or nest or something like that.

However, today I found a sweet old wooden frame that was falling apart, but, it had a fabulous vintage floral print in it. PERFECT!!! I couldn't wait to get home and pull this old window out and replace the print. I even love the green paint with it, so I decided not to paint the window after all.

Part of the charm of this old window is the handle on the bottom and part of the lock still on the top.


Probably the easiest before and after project ever!
'til next time,
Adina
Subscribe to:
Comments (Atom)