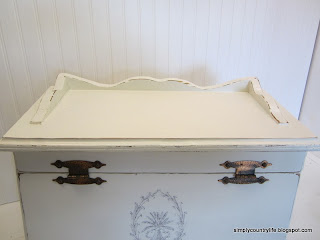
This old bread box seemed to be calling to me at a flea market.
I know it isn't much to look at, although the bears are kindof cute, right?
I couldn't wait to get this home and start a makeover. I had the perfect image in mind to use on it.
This image came from a great online image resource, www.TheGraphicsFairy.com. Karen has so many fabulous images and ideas on her website. This particular one can be found HERE. This image has already been reversed backwards so that it will transfer the right way.
Back to the breadbox. I removed the hardware, the knob, the bear appliques and the backing first. Gave it a good cleaning and sanding before painting it.
Once it was painted, I gave it a light distressing.
Now it was time to get the image onto the front of the bread box door. This process was a first for me. I have seen numerous methods to use to do this, found HERE. I decided I would try the mod podge transfer method. This method was a fail for me.
I guess I wasn't patient enough. I think I rubbed the image too hard or too quickly, because I removed more of the image than I wanted to.
Take 2 - I sanded the door of the breadbox back to the wood and repainted it so I could try again using another method. This time I tried the wax/freezer paper method.
I cut a piece of wax paper to fit onto a piece of copy paper. I taped it onto the copy paper with double sided tape, with the shiny side up. Then I printed my reversed image onto the shiny side of the wax paper. I did not have any problems with this process at all. Just be very careful when you remove the paper from the printer because the ink will be wet and will smudge easily. The next step was to place the paper image side down on the bread box door exactly where I wanted it. It can't be moved around, again, you'll smudge the image. Using the back of a spoon, I rubbed over the entire image thoroughly to make sure it transferred to the door. I was truthfully shocked that it had worked! This method was super easy to do and it worked like a charm.
Once the image was on the door, I reattached the knob and gave the whole piece a clear protective finish. Then I reattached the original hinges. I liked them and thought they worked well with the entire piece. I had to cut out a new piece of wood for the backing because the old backing wasn't in very good condition. This is a really thin piece of wood that I already had and I reused the original tack nails to secure it on with.
That's it, the makeover is finished and I love how it turned out.
What do you think?
Have you ever tried to transfer an image to wood and if so what method did you use?
I have a few more image transfer projects in mind.
'til next time,
Adina
Linking to
Snazzy Little Things
Snazzy Little Things


It looks great! I have used the transfer method before and found it worked pretty good. Like you said, you just have to be careful not to smudge the image. :)
ReplyDelete