

Showing posts with label under 800 square feet. Show all posts
Showing posts with label under 800 square feet. Show all posts
Thursday, January 2, 2014
Cabin Chronicles Part 12 - Reclaimed Barnwood Kitchen Cabinets
Wednesday, December 11, 2013
Cabin Chronicles Part 11

Wednesday, November 20, 2013
Cabin Chronicles Part 10

(here's a pic of the completed fireplace and chinking)
Thursday, August 29, 2013
Cabin Chronicles Part 7 - Starting on the Inside!
Yay - we're finally working on the inside of the cabin!
We were winging the floor plan as we went, which made for a few misplaced electrical outlets, lighting fixtures and windows, but overall, everything worked out alright. We had a general idea of how we wanted to design the layout of the rooms and we just went with it. As you walk through the front door the stairs will be immediately to your right.

The stairs consisted of a handmade ladder through most of the construction process.
(sorry for the dark photo)
The kitchen area begins under the stairs and continues in an L shape around the back right corner. We insulated between the logs and framed this area out with plywood first. This saved us from having to chink between the logs in that area. It also provided a way to measure and mark where the stove, sink and fridge would go. This was pertinent so that we could run the electric and plumbing to the right places. We went to Lowes and picked out an apartment size stove and a small 15 cubic foot fridge that weekend. We joked about how our Saturday night dates always consisted of a trip to Lowes. It seemed as if they knew us by name there. Anyways, we weren't ready to purchase the appliances yet because we did not have a place to store them, but we needed the dimensions to proceed with construction. Here's the rough layout of the kitchen area.


The fridge will sit under the stairs, the stove will go next to the fridge with a small counter in between them and the sink will go on the back wall. As you can see, we built temporary counters to help us with the measurements and design. We also left a few logs exposed around the top.
To the left of the kitchen area there is a doorway into a small hallway to access the back bedroom and bathroom. This doorway is directly across the cabin from the front door.

Here's a pic standing in this back doorway looking torward the front door.

Now around to the other side of the cabin. This area is to the left as you walk in the front door and it will be an open living/dining area with a fireplace in the middle of the wall. The fireplace opening is framed out in between the two windows.


Through the back doorway, we created a small hallway with two doors. A small door straight ahead will lead into the bedroom and another door on the right leads into the bathroom/laundry room.
This is the bathroom.

Notice the boards on the floor. I used them to design the space. They were representative of the toilet, sink, shower and stackable washer dryer unit. Again, we had another date at Lowes to get the dimensions of everything. We decided on a 48" shower stall. We intended to go with a smaller one, but I have really long legs and didn't want to be cramped while shaving.
I can't tell you how many times I rearranged this space before making a final decision on the placement of everything. The bathroom is roughly 6 feet across by 12 feet deep. We decided to place the 4 foot shower along the back 6 foot wall and create a small closet area with the remaining space. You've got to love closet space, even if it is small. This closet is accessible from the bedroom side. The toilet and sink are directly across from each other in the middle of the room and the stackable washer dryer unit is in the corner opposite of the shower, right in front of the door.
Now that we know where everything is going we can begin to run the electric and plumbing. We are blessed with wonderful neighbors and have one who happens to be a retired electrical engineer. He helped a lot with the plumbing and electric. He also helped a lot with passing the inspections too!
Here's a few pics of the electric and plumbing phase.


Check back next week, the upstairs floor is next and it was a real challenge.
You can see how we made it from 2x4 lumber.
If you've missed any of the construction up to this point, you can start from the beginning HERE.
Thanks for following along.
'til next time,
Adina
Linking to:
Monday, August 19, 2013
Cabin Chronicles Part 6
Adding a room to the back of the cabin.

This part of the construction was more traditional. This room has 2x6 framed walls. It measures 16' across the back of the cabin by 12' deep. It houses a small 9x12 bedroom and a full 6x12 bathroom.
Unfortunately, I must not have taken very many pictures through this process. So I'll try to describe the process. We built the floor joist system, just like we did in the main part of the cabin, by building the rectangle framework first, then attaching board stringers every two feet inside of the frame. Next we cut smaller two foot pieces to run in between the stringers to help add strength and to keep them straight. This is an important step because when you attach your flooring on top of them you will know that the stringer boards are exactly two feet apart and that the boards do not bow or curve. We were able to easily attach the sheets of subflooring over the flooring system.
Here's a pic of the floor in the main part of the cabin to give you a better idea of what I'm trying to explain.

Once the floor was built and attached to the back of the cabin and level, we were able to start building the walls. The wall framing is similar to the floor. We built a rectangle framework first on the ground and attached 2x6 boards vertically inside of the framework every two feet. Then we would pick up the entire wall frame and attach it to the floor. We made three walls like this because we are using the back log wall as a focal wall in these rooms. Once all three walls were securely attached and square we wrapped them in Tyvek house wrap to help provide a moisture barrier.

(outside)

(inside)
Once the walls were wrapped we covered the outside in sheets of exterior grade T111 and added battons (the skinny vertical boards) to give the walls some depth and character.
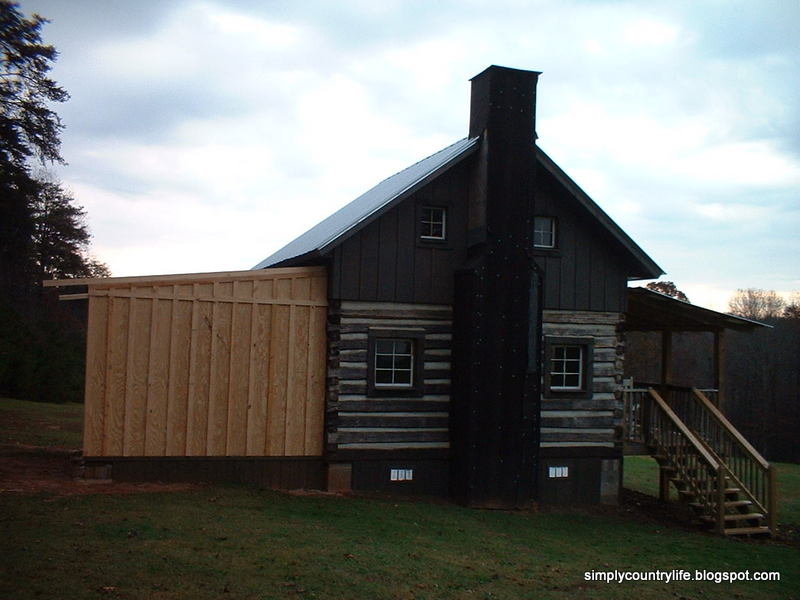

Then we proceeded to build the roof.
We used the beams that supported the top floor of the original cabin as exposed rafters in the bedroom portion of this addition and standard 2x6 boards as rafter beams in the bathroom portion.

(this is the inside ceiling with the old beams)
The interior ceiling has T111 attached on top of the rafter beams, to leave the beams exposed. The roof was built up from there and insulated and covered with roofing tin.
Here's a pic inside of the room

The additions exterior structure was almost complete at this point! We installed windows, one in the bedroom and one in the bathroom. We didn't put any windows on the back wall because it faces directly into the woods.

All that was left was to stain the outside with the stain mixture we used on the rest of the cabin. We painted on a couple of coats of this protective stain and going into the early winter of 2009 we have completed the exterior structure of our cabin!!!!
We were super anxious at this point to get the stonework on the chimney done so that we could take a step back and admire everything that had been accomplished so far. We were so anxious to get it done, we actually hired a neighbor who specializes in stone work to have his company do it for us. My husband is deathly scared of heights and it seemed worth it to him to have someone else tackle this project. They covered the chimney and the cinderblock foundation pillars in stone. They did a wonderful job and it only took them 2 days!

Looking back, this took just over 1 1/2 years of laboring on weekends and nights and tackling projects as funds would allow.
Sometimes, you have to look back at what you have accomplished to help motivate you to keep moving forward. We were halfway there and soon we were going to be able to start creating and bringing the inside of the cabin to life. To me, that seemed like the fun part!
If you would like to look back over how we got to this point and follow along with our progress go HERE.
I'll be sharing the beginnings of the inside next, stay tuned....
'til next time,
Adina
Subscribe to:
Posts (Atom)