Who doesn't love changing throw pillows for each season?
It's such an easy way to change up a room.
They can quickly add pops of color or seasonal accents.
I'm loving the way a few throw pillow covers I made this week turned out!
These pillow covers are super easy to make. They have envelope closures on the back. No zippers and basic sewing. I'll post more about how to make the covers later, but for now...
... I have a tutorial ready on how I printed these vintage images directly onto fabric, using freezer paper and my home printer.
I chose a creamy white piece of cotton that has a natural duck cloth look with flecks of tan in it.
The images show up great on it and it matches the ticking fabric that the covers are made from.
1st step - cut a piece of fabric slightly larger than a piece of printer paper. (I used a 8.5 x 11 piece)
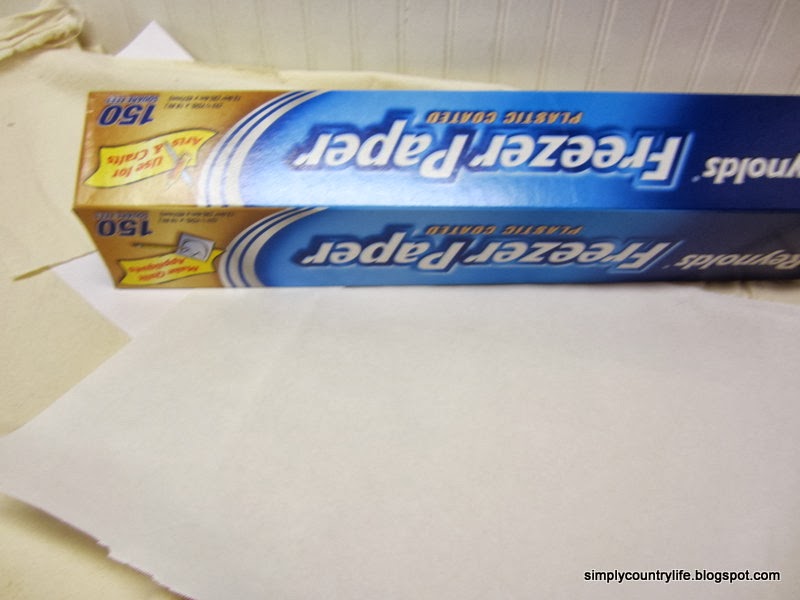
2nd step - cut a piece of freezer paper the same size as your cut piece of fabric - slightly larger than your printer paper.
3rd step - lay the side of the fabric that you want the image printed on facing down. Lay the shiny side of the freezer paper onto the fabric and iron over it until it adheres to the fabric, making it one piece.
4th step - trim your fabric paper exactly to the printer paper size
5th step - lay your fabric paper in your printer tray. Make sure the fabric side is facing the correct way for your printer to print on it and not the freezer paper side. Now you are ready to print the image of your choice onto your fabric.
I found that the fabric fed into the printer better without additional paper in the tray.
I did have some trouble with the fabric feeding through. It jammed, didn't feed through quick enough and only printed 1/2 of the image and sometimes it just wouldn't feed at all.
Obviously, I did have successes too!
I have printed six different images and plan to sew them onto pillow covers this upcoming week to add to my Etsy shop.
I purchased most of my images from this great Etsy shop.
6th step - once your image is printed successfully just peel the freezer paper off of the back
Your image is ready to be sewn onto a pillow cover, a tote bag or just framed in an embroidery hoop or picture frame. You could even create smaller images to use as fabric tags to tie onto gifts or baskets.
I'm sure I'll be trying other projects using this printing method.
I'm super pleased with how detailed the images printed and what they add to the pillow covers!
I did try to wash one and most of the color washed out leaving just black outlines of the image.
(these covers will have to be spot washed)
I'd love to figure out how to make the images permanent.
If you have any suggestions, please let me know.
I'm anxious to finish the rest of the covers!
'til next time,
 Linking to:
Funky Junk Interiors
A Night Owl Blog
Between Naps on the Porch
By Stephanie Lynn
Confessions of a Plate Addict
My Uncommon Slice of Suburbia
The DIY Dreamer
The Vintage Farmhouse
Savvy Southern Style
Ivy and Elephants
The Newlywed Pilgrimage
Snap Creativity
52 Mantels
Design Dining and Diapers
The Pin Junkie
Nifty Thrifty Things
Love Grows Wild
Knick of Time Interiors
Not Just a Housewife
My Repurposed Life
Common Ground
Linking to:
Funky Junk Interiors
A Night Owl Blog
Between Naps on the Porch
By Stephanie Lynn
Confessions of a Plate Addict
My Uncommon Slice of Suburbia
The DIY Dreamer
The Vintage Farmhouse
Savvy Southern Style
Ivy and Elephants
The Newlywed Pilgrimage
Snap Creativity
52 Mantels
Design Dining and Diapers
The Pin Junkie
Nifty Thrifty Things
Love Grows Wild
Knick of Time Interiors
Not Just a Housewife
My Repurposed Life
Common Ground


Adina,
ReplyDeleteI adore your ticking pillows, dear one!!!
This Summer, I made a ticking pillow using vintage buttons!!!
Thank you for sharing these lovely Seasonal pillows with us!!!
Visiting from Susan's MM!!!
Fondly,
Pat
Don't you just love ticking fabric! Thank you so much for your kind words, they made my day!
DeleteAdina
Adina this is so awesome. I really enjoyed this inspirational post. I would love it if you would share this post at our What’s It Wednesday linky party? Hope to see you there!
ReplyDeletePaula
ivyandelephants.blogspot.com
Very, very nice!!
ReplyDeleteThank you Jeannie!
DeleteYour pillows are beautiful!
ReplyDeleteThank you so much Dee!
DeleteLove the idea of the freezer paper. i usually tape the fabric on a sheet of paper. I will be interested if someone comes up with the answer of how to make the printer permanent.
ReplyDeleteThe freezer paper worked great! I'll definitely write a post if I figure out a way to make the ink permanent.
DeleteThank you,
Adina
How lovely! We've pinned this to our group Pinterest board and we are so excited to feature you on our Moonlight & Mason Jars Link Party tomorrow! Xo
ReplyDeleteJennifer - thank you so much. I've been enjoying your party and your blog!
DeleteLooks so cozy and inviting for the holidays!
ReplyDelete<3 Christina @ I Gotta Create!
Wildly Original link party every Wednesday evening.
Thank you Christina!
DeleteI absolutely love how these turned out! I'm giving you a shout-out on my Facebook page - https://www.facebook.com/KnickofTime
ReplyDeleteThanks for sharing at Knick of Time Tuesday!
Very, very cool! I only fear for my printer...
ReplyDeleteBeautiful Pillows! I believe the labels are better because it cuts out TWO steps! cutting the freezer paper and ironing it. :) I'm a lazy DIY'er.
ReplyDeleteLove your project!