Tuesday, August 13, 2013

Plain Wood Serving Tray turned Shabby Farmhouse Decor

I'm definitely liking the end results of transferring images onto wood, plus it's quick and easy.

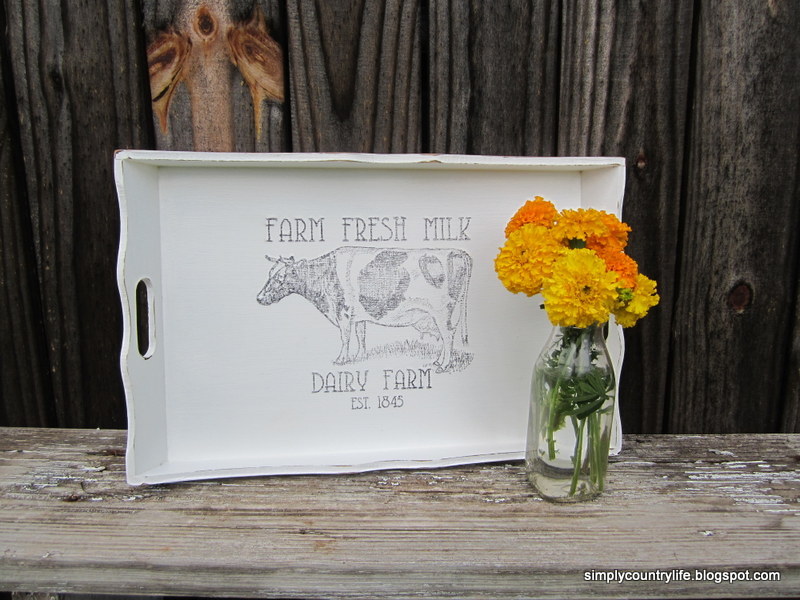
Here's another Goodwill makeover that I worked on this week using wax paper to transfer a Farm Fresh Milk Cow image onto a plain wood serving tray. I purchased the image from an Etsy shop called Graphic Marketplace. You can check them out HERE.


 Before


After


As you can see, the tray got a new coat of paint, after a thorough cleaning and sanding. I lightly distressed the edges of the tray to give it a shabby look and then transferred the image onto it. Lastly, I sprayed the tray with a clear matte sealer to help protect it.

If you want to see another transformation that I did using one of their graphics go HERE.


If you would like to find out how I easily transferred the image onto the wood tray using wax paper, click HERE. This will take you to another post that links to the steps to do it, along with numerous other methods that you can use.

Here's a closer picture of the image on the tray.


I did lightly color it in with a black colored pencil just to darken it a bit.


I already have another project started using this method, again, that I'll be posting about soon. If you'd like to see a cheese box that I madeover similar to this tray click HERE.


Thanks for stopping by to take a peek at my makeover.

'til next time,
Adina


Linking to:


Think%2520Tank%2520Thursday Welcome to Think Tank Thursday #43


Friday, August 9, 2013

Cheese Box Turned Shabby Farmhouse Storage

Here's another image transfer project.

It's totally making me wish I had an adorable farmhouse to use it in.


This started out as a plain old wood Wisconsin cheese box from Goodwill.


The box itself was in good shape. I grabbed it as soon as I saw it, but then I wasn't sure, so I put it back. I grabbed it again a few minutes later and still wasn't completely sure what I could do with it. I bought it, brought it home and began looking online for a graphic image that I could transfer onto it. It wasn't long before I spotted this cow image HERE and purchased it. I wanted a dairy/cow/farm image to coincide with the fact that this was a cheese box.


This is the second project that I have used wax paper to transfer an image onto painted wood.
 You can see the other project and read more about how this is done HERE.
The Etsy shop I purchased the image from even provided a reversed image, which saves a step.

I painted the box white and lightly distressed the edges before I transferred the image onto the top.


The image wasn't quite as dark as I would've liked for it to be so I used a black colored pencil and lightly colored it in a little.


You can kindof see a difference in the two pictures after I colored it in.

I also sprayed a clear matte sealer on the box to help protect it. 


That's it. I love how it turned out!

'til next time,
Adina


 Linking to:


By Stephanie Lynn

Thursday, August 1, 2013

Shabby French Grains Bread Box Makeover

This old bread box seemed to be calling to me at a flea market.
It is handmade, has nice details and is large and sturdy.


I know it isn't much to look at, although the bears are kindof cute, right?

I couldn't wait to get this home and start a makeover. I had the perfect image in mind to use on it.


This image came from a great online image resource, www.TheGraphicsFairy.com. Karen has so many fabulous images and ideas on her website. This particular one can be found HERE. This image has already been reversed backwards so that it will transfer the right way.

Back to the breadbox. I removed the hardware, the knob, the bear appliques and the backing first. Gave it a good cleaning and sanding before painting it.


Once it was painted, I gave it a light distressing.

Now it was time to get the image onto the front of the bread box door. This process was a first for me. I have seen numerous methods to use to do this, found HERE. I decided I would try the mod podge transfer method. This method was a fail for me.


I guess I wasn't patient enough. I think I rubbed the image too hard or too quickly, because I removed more of the image than I wanted to.

Take 2 - I sanded the door of the breadbox back to the wood and repainted it so I could try again using another method. This time I tried the wax/freezer paper method.


I cut a piece of wax paper to fit onto a piece of copy paper. I taped it onto the copy paper with double sided tape, with the shiny side up. Then I printed my reversed image onto the shiny side of the wax paper. I did not have any problems with this process at all. Just be very careful when you remove the paper from the printer because the ink will be wet and will smudge easily. The next step was to place the paper image side down on the bread box door exactly where I wanted it. It can't be moved around, again, you'll smudge the image. Using the back of a spoon, I rubbed over the entire image thoroughly to make sure it transferred to the door. I was truthfully shocked that it had worked! This method was super easy to do and it worked like a charm.


Once the image was on the door, I reattached the knob and gave the whole piece a clear protective finish. Then I reattached the original hinges. I liked them and thought they worked well with the entire piece. I had to cut out a new piece of wood for the backing because the old backing wasn't in very good condition. This is a really thin piece of wood that I already had and I reused the original tack nails to secure it on with.


That's it, the makeover is finished and I love how it turned out.


What do you think?
Have you ever tried to transfer an image to wood and if so what method did you use?
I have a few more image transfer projects in mind.

'til next time,
Adina


52 Mantels
 
craftberrybush the-inspiration-gallery-46
 
anightowlblog/create-inspire-party
My Uncommon Slice of Suburbia

Tuesday, July 23, 2013

Don't Throw that Away - Furniture Salvage Upcycled into a Coat Rack

You gotta love other peoples trash!
 
This piece of furniture salvage was going to be discarded because most of the ornate wood carvings were broken and had fallen off of it. I loved the shape of it and was more than happy to save it from the burn pile.


This is a picture after I had removed the broken trim pieces and had cleaned it up and sanded it. I was able to keep the trim piece in the top center. I like that it adds a little something to it.


Once this was sanded, I painted it a creamy off-white color, distressed the edges a little and gave it a clear matte finish.


Originally I was thinking I wanted to make this piece into a sign that said ANTIQUES on it, but then I changed my mind. Coat rack kept coming to mind now.  The next step was to visit a Hobby Lobby to see if they had any hooks that caught my eye and they did! I grab 4 of these brass hooks while they were on 50% off and also purchased a package of brass screws to attach them with.


Attaching the hooks was trickier than it would seem. A five minute task turned into a half an hour task. Two of the screws did not want to screw in. I'm guessing it was because the wood might have had a knot where I was trying to screw them in at. I had to predrill small holes in order to get the screws to go in. Then the head of one of the screws broke off while screwing it in. Now I had to figure out how to remove a broken screw that was sharp and sticking out of the wood. Needlenose pliers eventually did the job of removing the broken screw. Finally, all four hooks were securely attached and the coat rack was finished!


I'm always looking at things with a creative eye to see what I can turn it into.
 I love how this piece turned out, but I don't have the room for it in our little log cabin so it's going in my Etsy shop.
 
 
I'm off to start another project!
 
 
'til next time,
Adina


Linking to


Thursday, July 18, 2013

Quick Vintage Pie Tin and Wood Spool Makeover

I just love the combination of metal with wood.


I have used vintage pie tins and old wooden textile spools in our cabin for decor.
The pie tins are hung on the rafter beam above the logs in our kitchen and the spools are used as pillar candle holders on our mantle.
I had one pan and a couple of textile spools I wasn't using so I decided to make them into a pedestal dish.


In order to stabilize the pedestal more I added a round wood base to the bottom of the spool. This piece was another leftover from a glass dome that had been broken.


To securely attach the pieces together my husband helped me drill a hole in the center of the wood base the same size as the hole running through the center of the spool. We slid a wood dowel through the spool and into the base using wood glue to secure it. Clamped it for the night and walked away. The next day we drilled a small hole in the center of the pie tin and used a nail to secure it into the wood dowel in the center of the spool. We also added a little more glue between the tin and spool.


As you can see, the tin has great graphics and the nailhead barely shows in the middle.
 
I've used this to display handmade soaps...
 
 
... it could be used as a fruit bowl, candle holder, or add a glass dome to it to use as a dessert stand or make a few in different heights to add some interest to a food buffet at your next party!
 
What would you use it for?


'til next time,
Adina


Linking to: