Showing posts with label cabin. Show all posts

Tuesday, March 11, 2014

Spring Daffodil Watering Can Centerpiece

Here in South Carolina we have been super blessed with warmer temps these last few days.
 
It definitely makes it feel like Spring,
especially when daffodils are blooming everywhere.
 
I brought a little spring indoors today by creating a centerpiece
using daffodils, a rustic wood tray and a few thrifted watering cans.


I found this set of three cute watering cans last fall
and purchased them to use this spring.
 

Thursday, February 13, 2014

Our Cabin in the Snow

Just thought I'd share a glimpse into our world this week.
We are in the northern part of Upstate South Carolina.


Thursday, January 2, 2014

Cabin Chronicles Part 12 - Reclaimed Barnwood Kitchen Cabinets

This project was my favorite part of the construction of the cabin.
 
Building the kitchen cabinets from salvaged barnwood!
 
A quick story on the barnwood.
The wood was milled right up the road from us by a neighbors dad.
It was used to build one of his barns in the mid 1900s.
 His dad passed away a couple of years ago, well into his 90s.
The barn was starting to collapse and our sweet neighbor asked us if we wanted the wood.
Are you kidding me? Of course we wanted it!
There was only one catch, we had to take the barn apart piece by piece and denail the wood.
What a wonderful blessing for us and it keeps his dads barn living on.


Friday, November 22, 2013

Old Tin Measuring Cups Turned Christmas Decor

Are there certain items that you always tend to purchase when you find them at a really good price?
Even if you don't need them or know what you are going to do with them?
 
Aluminum measuring cups are one of those things that I always grab when I see them.
I don't even know why, except that I like them.


Wednesday, November 20, 2013

Cabin Chronicles Part 10

Chinking the inside of the cabin and building the fireplace hearth.
 
In between the logs there is actually some insulation. It is encased between metal lathe and the chinking compound on both sides. Inside and outside.
 
I do not have pics of us working on the chinking inside, but you can see how we did it on the outside HERE. It was the same process inside, except we stuffed insulation in between the logs before we nailed the metal lathe up.
 
 
(here's a pic of the completed fireplace and chinking)
 

Saturday, November 16, 2013

Cabin Chronicles Part 9

More flooring...
 
We created all of our flooring from lumber. Some purchased, some salvaged from a home remodel.
 
 The upstairs floor was made from 2x4s to create a 2" thick floor
and the downstairs floor was made from 1" thick boards.
 
You can see how we made the flooring HERE.
 
This is the only pic I have of the downstairs flooring.
 
 
We used 1x6 inch boards for the back bedroom and bathroom floor
and 1x10 inch boards for the living/main room floor.
 

Thursday, September 12, 2013

Cabin Chronicles Part 8

Moving right along and moving to the upstairs.

 
How do you like our handmade, makeshift ladder staircase?
 
This was our only way to get up and down for most of the construction process. It was a little tricky when your hands were full of tools or lumber, but it worked.

We decided to create our own wood floor from 2x4 boards. This saved a lot of cash. Buying 2" thick wood flooring was pricey. The floor had to be 2" thick upstairs to meet building codes because there is not a subfloor up there. Normally, when you have a subfloor already down you can use 1" flooring.
 
 
So, how did we turn regular old 2x4 lumber into flooring?
 
We set up a table saw downstairs and set a guide on it at 1 inch. The blade was also set at 1" deep. We placed a 2x4 board on the table and pushed it against the guide and ran it over the saw blade, which made a 1" deep cut along the length of the board. You can see this cut in the picture below. It is marked with a black arrow.


Then we would turn the board on it's small edge and push it against the guide again and run it along the blade. This created a 1" square cut out of the corner of the 2x4. The red arrow points to a corner that is finished.
 
We made these cuts on two opposite corners of each board. This created a "lip" so that we could overlap the 2x4s when we nailed them down as flooring.
 
 
Hopefully, you can kindof see what I'm trying to explain.
Here's a diagram, just pretend the black areas are the ends of two boards. 
Each board can slide together and create a floor without gaps.
 
Boy did this take FOREVER and it wasn't without tears. The table saw totally freaked me out because the blade is exposed and I was certain we would not get through this project without losing an appendige. The boards were 12 feet long and it took patience to guide each board over the blade the whole length. Each board had to be cut four times. I just knew something besides the board was going to get cut, but it didn't. Whew.
 
But wait, it wasn't all smooth sailing. Once we were nearing the end of our HUGE pile of boards and all of them where cut so nicely and ready to be nailed down, we realized they didn't fit together very nicely after all. At some point the guide that was set at 1" had moved to less than 1". The cuts we had made were not going to be deep enough to overlap the edges of the 2x4s.
 
It was late and we had been at this all evening. I was tired and in tears at this point. I really wanted to get up the next day and nail the boards down and be done with the upstairs floor, but that wasn't going to happen. We had to recut at least half of the boards before we could proceed to the nailing part.
 
 
There's my husband, looking in digust at the boards. That pile was only a small amount of the 1000s 100s we had cut. I'm plopped on the sawdust covered floor crying in the corner.
 
What else do you do at 1am but go to bed. We got up Saturday morning ready to tackle this again and recut the boards. By lunchtime we were ready to start carrying boards upstairs and nailing them into place. This part went pretty quickly. He was upstairs nailing and calling down the measurement for the length of the next board so that I could cut it and hand it up to him. We staggered the lengths so that the seams between the ends of the boards weren't all in the same place, creating a funny looking line across the floor.
 
 
Again, this part went quickly. It was only mid afternoon and we were done. I think a shower followed by a nap was the next thing on my todo list that day.
 
The floor turned out great and it created a cool looking ceiling in the downstairs area too.
 
 
These pics are a little farther along in the construction, but they give you a better idea of what the floor looks like. (covered in sawdust)


You'll have to check back later to see what the ceiling downstairs looks like. I'll show you that when we get closer to the end of the construction.
 
If you'd like to see the pile of logs we started with,
you can follow along the whole construction process here.
 
 
'til next time,
Adina


Thursday, August 29, 2013

Cabin Chronicles Part 7 - Starting on the Inside!

Yay - we're finally working on the inside of the cabin!
 
We were winging the floor plan as we went, which made for a few misplaced electrical outlets, lighting fixtures and windows, but overall, everything worked out alright. We had a general idea of how we wanted to design the layout of the rooms and we just went with it. As you walk through the front door the stairs will be immediately to your right.
 
 
The stairs consisted of a handmade ladder through most of the construction process.
(sorry for the dark photo)
 
The kitchen area begins under the stairs and continues in an L shape around the back right corner. We insulated between the logs and framed this area out with plywood first. This saved us from having to chink between the logs in that area. It also provided a way to measure and mark where the stove, sink and fridge would go. This was pertinent so that we could run the electric and plumbing to the right places. We went to Lowes and picked out an apartment size stove and a small 15 cubic foot fridge that weekend. We joked about how our Saturday night dates always consisted of a trip to Lowes. It seemed as if they knew us by name there. Anyways, we weren't ready to purchase the appliances yet because we did not have a place to store them, but we needed the dimensions to proceed with construction. Here's the rough layout of the kitchen area.


The fridge will sit under the stairs, the stove will go next to the fridge with a small counter in between them and the sink will go on the back wall. As you can see, we built temporary counters to help us with the measurements and design. We also left a few logs exposed around the top.
 
To the left of the kitchen area there is a doorway into a small hallway to access the back bedroom and bathroom. This doorway is directly across the cabin from the front door.


Here's a pic standing in this back doorway looking torward the front door.
 
 
Now around to the other side of the cabin. This area is to the left as you walk in the front door and it will be an open living/dining area with a fireplace in the middle of the wall. The fireplace opening is framed out in between the two windows.


Through the back doorway, we created a small hallway with two doors. A small door straight ahead will lead into the bedroom and another door on the right leads into the bathroom/laundry room.
 
This is the bathroom.
 
 
Notice the boards on the floor. I used them to design the space. They were representative of the toilet, sink, shower and stackable washer dryer unit. Again, we had another date at Lowes to get the dimensions of everything. We decided on a 48" shower stall. We intended to go with a smaller one, but I have really long legs and didn't want to be cramped while shaving.

I can't tell you how many times I rearranged this space before making a final decision on the placement of everything. The bathroom is roughly 6 feet across by 12 feet deep. We decided to place the 4 foot shower along the back 6 foot wall and create a small closet area with the remaining space. You've got to love closet space, even if it is small. This closet is accessible from the bedroom side. The toilet and sink are directly across from each other in the middle of the room and the stackable washer dryer unit is in the corner opposite of the shower, right in front of the door.
 
Now that we know where everything is going we can begin to run the electric and plumbing. We are blessed with wonderful neighbors and have one who happens to be a retired electrical engineer. He helped a lot with the plumbing and electric. He also helped a lot with passing the inspections too!
 
Here's a few pics of the electric and plumbing phase.


Check back next week, the upstairs floor is next and it was a real challenge.
 You can see how we made it from 2x4 lumber.
 
If you've missed any of the construction up to this point, you can start from the beginning HERE.
 
Thanks for following along.
 
'til next time,
Adina


Linking to:


Monday, August 19, 2013

Cabin Chronicles Part 6

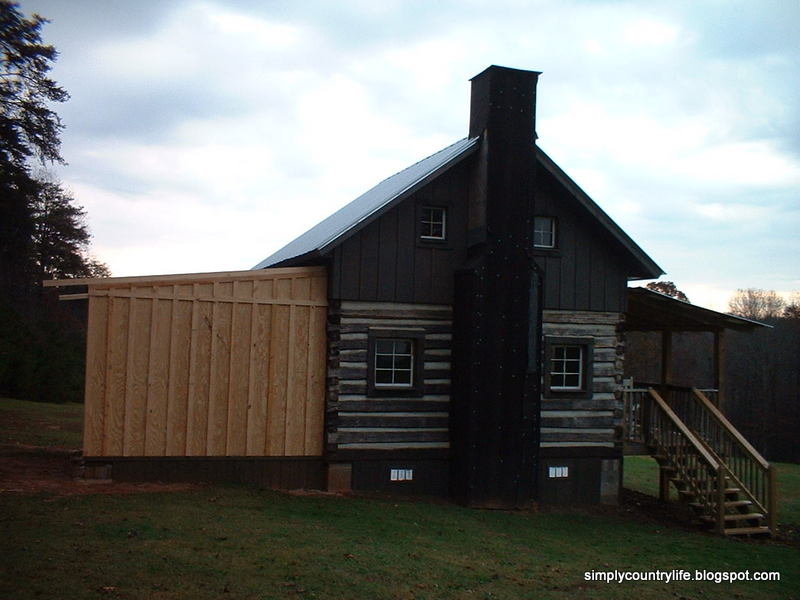
Adding a room to the back of the cabin.


This part of the construction was more traditional. This room has 2x6 framed walls. It measures 16' across the back of the cabin by 12' deep. It houses a small 9x12 bedroom and a full 6x12 bathroom.

Unfortunately, I must not have taken very many pictures through this process. So I'll try to describe the process. We built the floor joist system, just like we did in the main part of the cabin, by building the rectangle framework first, then attaching board stringers every two feet inside of the frame. Next we cut smaller two foot pieces to run in between the stringers to help add strength and to keep them straight. This is an important step because when you attach your flooring on top of them you will know that the stringer boards are exactly two feet apart and that the boards do not bow or curve. We were able to easily attach the sheets of subflooring over the flooring system.

Here's a pic of the floor in the main part of the cabin to give you a better idea of what I'm trying to explain.
 
 
Once the floor was built and attached to the back of the cabin and level, we were able to start building the walls. The wall framing is similar to the floor. We built a rectangle framework first on the ground and attached 2x6 boards vertically inside of the framework every two feet. Then we would pick up the entire wall frame and attach it to the floor. We made three walls like this because we are using the back log wall as a focal wall in these rooms. Once all three walls were securely attached and square we wrapped them in Tyvek house wrap to help provide a moisture barrier.
 
(outside)
 
(inside)
 
Once the walls were wrapped we covered the outside in sheets of exterior grade T111 and added battons (the skinny vertical boards) to give the walls some depth and character.


Then we proceeded to build the roof.
 
 We used the beams that supported the top floor of the original cabin as exposed rafters in the bedroom portion of this addition and standard 2x6 boards as rafter beams in the bathroom portion. 
 
 
(this is the inside ceiling with the old beams)
 
The interior ceiling has T111 attached on top of the rafter beams, to leave the beams exposed. The roof was built up from there and insulated and covered with roofing tin.
 
 
Here's a pic inside of the room
 
 
The additions exterior structure was almost complete at this point! We installed windows, one in the bedroom and one in the bathroom. We didn't put any windows on the back wall because it faces directly into the woods.


All that was left was to stain the outside with the stain mixture we used on the rest of the cabin. We painted on a couple of coats of this protective stain and going into the early winter of 2009 we have completed the exterior structure of our cabin!!!!
 
We were super anxious at this point to get the stonework on the chimney done so that we could take a step back and admire everything that had been accomplished so far. We were so anxious to get it done, we actually hired a neighbor who specializes in stone work to have his company do it for us. My husband is deathly scared of heights and it seemed worth it to him to have someone else tackle this project. They covered the chimney and the cinderblock foundation pillars in stone. They did a wonderful job and it only took them 2 days!
 
 
Looking back, this took just over 1 1/2 years of laboring on weekends and nights and tackling projects as funds would allow.
 
Sometimes, you have to look back at what you have accomplished to help motivate you to keep moving forward. We were halfway there and soon we were going to be able to start creating and bringing the inside of the cabin to life. To me, that seemed like the fun part!
 
If you would like to look back over how we got to this point and follow along with our progress go HERE.
 
I'll be sharing the beginnings of the inside next, stay tuned....
 
'til next time,
Adina


Friday, May 11, 2012

Cabin Chronicles Part 4

Now that the cabin is under roof, it is time to start closing it in. I will apologize in advance for not having the foresight to always have a camera with me. There are a few steps that do not have "during" pictures.

I'm going to back up to Part 3 for a minute. While we were building rafters to support the roof tin we also framed out the upstairs loft walls.


Here's a view from the inside downstairs looking out of the front door.


At this point, I was beginning to have my "moments". I didn't think we would ever get finished with this project. I did not sign up for this. I really wanted my beach life back. Playing in the ocean seemed so much more enticing than spending another weekend in the blistering sun or freezing cold with a hammer and a saw. As discouragement was setting in, my husband shows up with a pair of rocking chairs for the front porch. WHY? Why rocking chairs and why now? If only they were beach chairs. He did have a reason. He sat me down in one of the chairs and had me envision what it would be like to be sitting here, one day, when the construction was complete. I guess it helped a little, if I closed my eyes really tight.


Enough dreaming, back to measuring and cutting.

We had purchased old windows that we refurbished for use in the cabin and needed to cut openings to fit two smaller windows on both sides of the chimney upstairs along with a larger window for the opposite wall upstairs. We also needed to cut four openings downstairs in the log walls to fit two windows on each side of the cabin. Once the openings were cut out we framed them in 2x6 lumber and hung the old windows. We also framed the openings for the front and back doors with 2x6 lumber and installed both doors.


This is the part with the missing pictures, so here are a couple that you can see the front and back doors in, however, the chinking in between the logs is already done in these pics and we haven't really done it yet.

Now we were able to start closing in the upstairs walls with really heavy, thick plywood and then we proceeded to cut battons to add some character to the plywood walls. Then we went on a hunt for a stain that would closely match the log color and were not successful at finding any, so we mix our own blend of three different colors to achieve what we thought was a pretty good match. We painted the plywood and battons with our stain blend with a couple of coats to make sure it was sealed and protected.


Maybe you can pretend that the chinking isn't completed in the above picture also, because I do not have pics of these steps. Although I probably should have. My husband, who is deathly afraid of heights and myself trying to balance large sheets of plywood on ladders with hammers. I bet it was a sight:)

The next step to close the cabin in is the chinking and I will share that with you next time.

Thanks again for following along. I hope you have a great weekend and remember, if you get discouraged in the midst of a huge undertaking, stop and daydream a little about the end result of your hard work. It actually does help to picture it complete and imagine the sense of accomplishment you will feel then:)
 
Sometimes it helps to look back at where you started to see just how far you've come. If you'd like to look back to where we started go to Part 1.
 
'til next time
Adina