

Showing posts with label fall. Show all posts
Showing posts with label fall. Show all posts
Monday, September 15, 2014
Handmade Fall Drop Cloth Pumpkins
Tuesday, November 5, 2013
Quick and Easy Simple Pumpkin Wreath

Thursday, September 19, 2013
Upcycled Rustic Pumpkin Candle Holder


I kept a pair to use in our cabin and the other pair went into my Etsy shop.
You'll probably never look at chair feet the same now.
'til next time,

Linking to:
Craftberrybush, Farmhouseporch, The Pin Junkie, 52mantels, A Night Owl Blog, Shabbynest, Tatertots and Jello, Six Sisters Stuff, Funky Junk Interiors, Its Overflowing, Uncommon Designs, Home Stories AtoZ, Cherished Bliss, Crafts a la mode, A Peek into my Paradise, A Stroll Thru Life,
Knick of Time Interiors, Love Grows Wild, Your Home Based Mom, The Hankful House,
The Shabby Creek Cottage, Cozy Little House, My Repurposed Life, The Best of DIYKnick of Time Interiors, Love Grows Wild, Your Home Based Mom, The Hankful House,
Friday, September 13, 2013
Rustic Burlap and White Pumpkin Fall Wreath
Oh how I love fall. The scents, the cooler temps, the colors, the coziness of it all.
I wasn't going to start decorating for Fall until the first weekend in October, but with the temps dropping a little and all of the wonderful inspiration around, I just couldn't help myself. I had to make something for Fall. I dug around in my craft stash and found a few things that got me started on this wreath.

This is an image I pinned last year and it is also where I drew my inspiration from for this wreath.

I love the neutral, rusticness of it. (is that a word?)
In my craft stash I found everything I needed to make this wreath. I had 6 faux orange pumpkins, scrap burlap, twine, stencils, paint and a grapevine wreath.
First, the orange pumpkins were getting a creamy white makeover to start this project.

I removed the brown stems from the pumpkins so that they wouldn't get painted white. I put them back in after the pumpkins were dry. I stuck the pumpkin floral pick stems in styrofoam so that I could spray them from all angles. This took a couple of coats of paint. In between these coats I started making the GIVE burlap pennant banner.


I cut a length of twine and also cut four 2" wide by 2 1/2" long triangles out of a manilla file folder to use for the letter pennants. I cut squares of burlap large enough to fold over the twine and cover both sides of the manilla triangles. With spray adhesive glue I attached the burlap to the triangle and them trimmed around it. I did this for each of the four letters.
Once the pennant banner was ready and the pumpkins were dry, I painted the letters on using stick on reusable stencils and black acrylic paint.


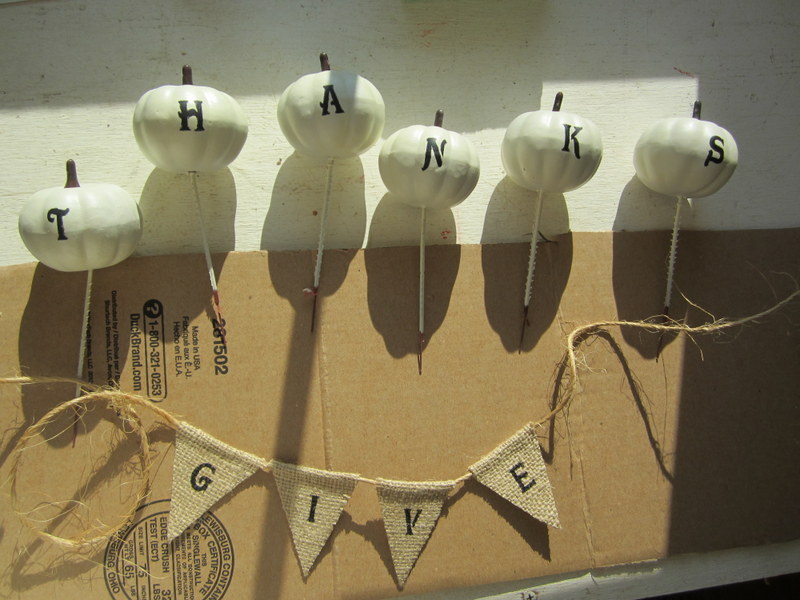
Notice the brown pumpkin stems are back on the pumpkins now :)
I was stumped at this point because the grapevine wreath I had wasn't large enough to accomodate all of my pumpkins without making the word THANKS look funny.
Then I remembered a different grapevine wreath, kindof a basket type, that I had picked up at a yard sale for a buck earlier this summer. It was larger and because it had an open basket type bottom, it worked great!
I tied the twine ends from the pennant around the top part of the wreath and started arranging the pumpkins on the bottom part. I used the stems to weave through the grapevine to hold them in place. The wreath looked a little bare at this point, so I added fall leaves and didn't like them and started looking for something else. That's when I found some preserved green moss. I placed it around the pumpkins and I think it was the finishing touch that the wreath needed. It kept it neutral, but added a little pop.


I'm thinking I'm liking the white pumpkins this year.
What about you, do you prefer orange or white?
Happy Fall decorating.
'til next time,
Adina
Linking to:
Vintage Inspiration Party
The Pin Junkie
Craftberrybush
Farmhouseporch
A Night Owl Blog
Shabbynest
Tatertots and Jello
Six Sisters Stuff
Funky Junk Interiors
Its Overflowing
Uncommon Designs
Home Stories AtoZ
Cherished Bliss
Your Homebased Mom
Flamingo Toes
Linking to:
Vintage Inspiration Party
The Pin Junkie
Craftberrybush
Farmhouseporch
A Night Owl Blog
Shabbynest
Tatertots and Jello
Six Sisters Stuff
Funky Junk Interiors
Its Overflowing
Uncommon Designs
Home Stories AtoZ
Cherished Bliss
Your Homebased Mom
Flamingo Toes


Subscribe to:
Posts (Atom)