

Showing posts with label rustic. Show all posts
Showing posts with label rustic. Show all posts
Thursday, June 26, 2014
Barnwood and Beadboard Patriotic Flags
Monday, May 26, 2014
Patriotic Burlap Wreaths

Thursday, March 13, 2014
Barb Wire and Horseshoe Wreath

Tuesday, March 11, 2014
Spring Daffodil Watering Can Centerpiece

I found this set of three cute watering cans last fall
and purchased them to use this spring.
Monday, January 27, 2014
How I Upcycled a Sweater into a Valentines Day Wreath

I had a white sweater that I was going to wear on Sunday
and when I put it on, I noticed there was a gaping hole right under the turtleneck.
I don't know how it got there and I hope it wasn't there the last time I wore it.
Tuesday, January 14, 2014
Rustic Valentine Banner from Scraps

The wood hearts are cut from a piece of a vintage fruit crate.
Thursday, January 9, 2014
Horseshoes and a Chunk of Wood get a New Life

Wednesday, December 18, 2013
Old Pickle Jars into Pottery Barn Knockoffs

Sunday, December 1, 2013
Burlap and a Dollar Tree Ornament

Sunday, November 10, 2013
Rustic Pine Cone and Burlap Wreath

The inspiration for this wreath came from Pinterest.
Tuesday, November 5, 2013
Quick and Easy Simple Pumpkin Wreath

Thursday, October 24, 2013
Rustic Wood Framed Faux Winter Chalkboard
Brrr

I had been given this rustic wood frame back in the summer and have held onto it until now.
I love that it has the bark left on the outer edges.

Chalkboards are super "IN" right now and I have yet to create one, but it is on my list of projects. You know that list, the one that never seems to end.
Friday, September 13, 2013
Rustic Burlap and White Pumpkin Fall Wreath
Oh how I love fall. The scents, the cooler temps, the colors, the coziness of it all.
I wasn't going to start decorating for Fall until the first weekend in October, but with the temps dropping a little and all of the wonderful inspiration around, I just couldn't help myself. I had to make something for Fall. I dug around in my craft stash and found a few things that got me started on this wreath.

This is an image I pinned last year and it is also where I drew my inspiration from for this wreath.

I love the neutral, rusticness of it. (is that a word?)
In my craft stash I found everything I needed to make this wreath. I had 6 faux orange pumpkins, scrap burlap, twine, stencils, paint and a grapevine wreath.
First, the orange pumpkins were getting a creamy white makeover to start this project.

I removed the brown stems from the pumpkins so that they wouldn't get painted white. I put them back in after the pumpkins were dry. I stuck the pumpkin floral pick stems in styrofoam so that I could spray them from all angles. This took a couple of coats of paint. In between these coats I started making the GIVE burlap pennant banner.


I cut a length of twine and also cut four 2" wide by 2 1/2" long triangles out of a manilla file folder to use for the letter pennants. I cut squares of burlap large enough to fold over the twine and cover both sides of the manilla triangles. With spray adhesive glue I attached the burlap to the triangle and them trimmed around it. I did this for each of the four letters.
Once the pennant banner was ready and the pumpkins were dry, I painted the letters on using stick on reusable stencils and black acrylic paint.


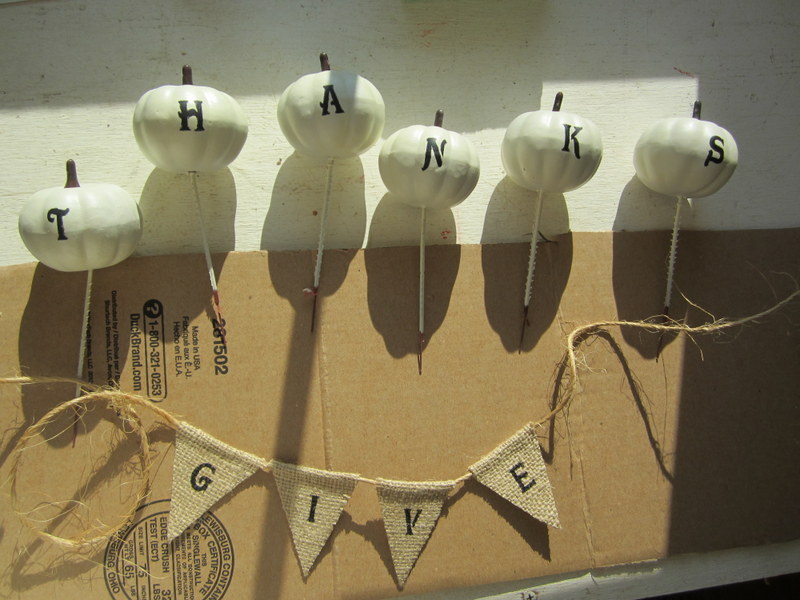
Notice the brown pumpkin stems are back on the pumpkins now :)
I was stumped at this point because the grapevine wreath I had wasn't large enough to accomodate all of my pumpkins without making the word THANKS look funny.
Then I remembered a different grapevine wreath, kindof a basket type, that I had picked up at a yard sale for a buck earlier this summer. It was larger and because it had an open basket type bottom, it worked great!
I tied the twine ends from the pennant around the top part of the wreath and started arranging the pumpkins on the bottom part. I used the stems to weave through the grapevine to hold them in place. The wreath looked a little bare at this point, so I added fall leaves and didn't like them and started looking for something else. That's when I found some preserved green moss. I placed it around the pumpkins and I think it was the finishing touch that the wreath needed. It kept it neutral, but added a little pop.


I'm thinking I'm liking the white pumpkins this year.
What about you, do you prefer orange or white?
Happy Fall decorating.
'til next time,
Adina
Linking to:
Vintage Inspiration Party
The Pin Junkie
Craftberrybush
Farmhouseporch
A Night Owl Blog
Shabbynest
Tatertots and Jello
Six Sisters Stuff
Funky Junk Interiors
Its Overflowing
Uncommon Designs
Home Stories AtoZ
Cherished Bliss
Your Homebased Mom
Flamingo Toes
Linking to:
Vintage Inspiration Party
The Pin Junkie
Craftberrybush
Farmhouseporch
A Night Owl Blog
Shabbynest
Tatertots and Jello
Six Sisters Stuff
Funky Junk Interiors
Its Overflowing
Uncommon Designs
Home Stories AtoZ
Cherished Bliss
Your Homebased Mom
Flamingo Toes


Monday, August 19, 2013
Cabin Chronicles Part 6
Adding a room to the back of the cabin.

This part of the construction was more traditional. This room has 2x6 framed walls. It measures 16' across the back of the cabin by 12' deep. It houses a small 9x12 bedroom and a full 6x12 bathroom.
Unfortunately, I must not have taken very many pictures through this process. So I'll try to describe the process. We built the floor joist system, just like we did in the main part of the cabin, by building the rectangle framework first, then attaching board stringers every two feet inside of the frame. Next we cut smaller two foot pieces to run in between the stringers to help add strength and to keep them straight. This is an important step because when you attach your flooring on top of them you will know that the stringer boards are exactly two feet apart and that the boards do not bow or curve. We were able to easily attach the sheets of subflooring over the flooring system.
Here's a pic of the floor in the main part of the cabin to give you a better idea of what I'm trying to explain.

Once the floor was built and attached to the back of the cabin and level, we were able to start building the walls. The wall framing is similar to the floor. We built a rectangle framework first on the ground and attached 2x6 boards vertically inside of the framework every two feet. Then we would pick up the entire wall frame and attach it to the floor. We made three walls like this because we are using the back log wall as a focal wall in these rooms. Once all three walls were securely attached and square we wrapped them in Tyvek house wrap to help provide a moisture barrier.

(outside)

(inside)
Once the walls were wrapped we covered the outside in sheets of exterior grade T111 and added battons (the skinny vertical boards) to give the walls some depth and character.
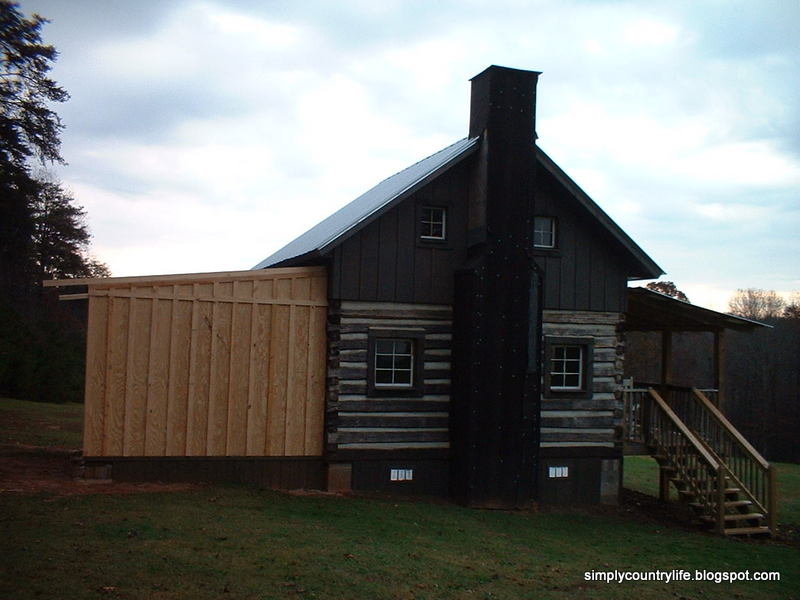

Then we proceeded to build the roof.
We used the beams that supported the top floor of the original cabin as exposed rafters in the bedroom portion of this addition and standard 2x6 boards as rafter beams in the bathroom portion.

(this is the inside ceiling with the old beams)
The interior ceiling has T111 attached on top of the rafter beams, to leave the beams exposed. The roof was built up from there and insulated and covered with roofing tin.
Here's a pic inside of the room

The additions exterior structure was almost complete at this point! We installed windows, one in the bedroom and one in the bathroom. We didn't put any windows on the back wall because it faces directly into the woods.

All that was left was to stain the outside with the stain mixture we used on the rest of the cabin. We painted on a couple of coats of this protective stain and going into the early winter of 2009 we have completed the exterior structure of our cabin!!!!
We were super anxious at this point to get the stonework on the chimney done so that we could take a step back and admire everything that had been accomplished so far. We were so anxious to get it done, we actually hired a neighbor who specializes in stone work to have his company do it for us. My husband is deathly scared of heights and it seemed worth it to him to have someone else tackle this project. They covered the chimney and the cinderblock foundation pillars in stone. They did a wonderful job and it only took them 2 days!

Looking back, this took just over 1 1/2 years of laboring on weekends and nights and tackling projects as funds would allow.
Sometimes, you have to look back at what you have accomplished to help motivate you to keep moving forward. We were halfway there and soon we were going to be able to start creating and bringing the inside of the cabin to life. To me, that seemed like the fun part!
If you would like to look back over how we got to this point and follow along with our progress go HERE.
I'll be sharing the beginnings of the inside next, stay tuned....
'til next time,
Adina
Tuesday, July 9, 2013
I just couldn't part with this old crate
My mom brought me an old fruit crate that she found during a trip to Connecticut. I loved the age and rustic appeal that it had, but I couldn't imagine it working in a practical way as a crate. The sides and bottom were made from thin boards and some of those boards were split, but I just couldn't part with the crate. So, I began carefully taking it apart.

I had intentions of using the two ends to make signs out of. They were made from thicker boards and had a trim piece of wood at the top and bottom. They had old nails holding them together and a lot of rustic charm.

The first sign I wanted to make was going to say FARM FRESH. I found a simple font and printed the letters out on paper in the size that I wanted to use as a template.

The next step was to color the back of the letters with chalk.

Then placing the paper with the chalk side down and the letters facing up, I traced each letter with a pencil to make a chalk outline on the wood.

I painted the letters with white paint and outlined them with a permanent black sharpie marker.

I sanded the paint a little to distress it and sprayed a clear matte finish over it to protect it. Then I added two eyelets to the top so that I could attach rusty wire to use as a hanger and then...
...more inspiration hit!
Remember the thin boards from the bottom of the crate that were splitting?
I decided to cut 3 smaller signs from them to hang from this sign.

Using the same chalk, trace and paint technique, I made signs saying EGGS, DAIRY and PRODUCE.

While I was cutting the smaller signs I also drilled small holes on the top and bottom of each end of each sign. I wanted to run rusty wire through them to hang them on the FARM FRESH sign. I also attached two eyelets to the bottom of the FARM FRESH sign and started weaving the wire through each sign.

Once the wire was ran through each sign and attached to the main part - this sign was finished!

I only wish I had space to hang it in my own home. I love how it turned out and that I was able to use the crate!
Here's what I did with the other end of the crate.

There are a few small pieces of the sides of the crate left. Maybe inspiration will hit me at some point and I'll have the perfect project to use them on.
'til next time,
Adina
Linking to:

Tuesday, June 26, 2012
Scrap Wood Patriotic Star Wreath
While we were building our log cabin, I saved ten small scrap pieces of wood from the burn pile and two years later I have turned them into stars!

I made two identical star wreaths. Each star used five pieces of the wood scraps. I arranged them into a star and glued the pieces together.


Then I brushed a vinegar solution onto them to age the wood. (let rusty metal sit in vinegar overnight to make this solution)

Once the stars dried for a little while in the sun today I attached red and blue pip berries, along with a burlap bow and an american flag with floral wire.


That's it. All done. I hung one on the front door of our cabin and the other one is for sale in my Etsy shop.

Every time we burned scrap wood while building I cringed. I had plans for all of it, however, my husband kept reminding me that as long as we were building there would be more scraps.
Don't you just love making a project from trash!
'til next time,
Adina
Linking to

Subscribe to:
Posts (Atom)