

Showing posts with label repurpose. Show all posts
Showing posts with label repurpose. Show all posts
Tuesday, June 16, 2015
Antique Singer Sewing Machine Table Makeover
Monday, May 18, 2015
Antique Vanity Mirror Turned Wall Shelf

Wednesday, November 12, 2014
Vintage Jello Tins and Molding Candle Holder

Thursday, October 30, 2014
Cabinet Door Repurposed into Mason Jar Wall Vase

Monday, March 31, 2014
Cabinet Doors Repurposed into Dairy Signs

Monday, March 17, 2014
Red Repurposed Cabinet Door Chalkboard

Monday, March 10, 2014
Headboard Repurposed into Bon Appetit Sign

This sign started out as part of a headboard.
Friday, February 28, 2014
Repurposed Vintage Pie Tin Cloche

Thursday, February 20, 2014
I Joined the Chalkboard Bandwagon


Tuesday, January 28, 2014
My 2nd Silhouette Project - Barnwood Cowgirl Up Horseshoe Sign

I cleaned up a piece of barnwood that I had leftover from building the kitchen cabinets in our cabin.
(you can check out our barnwood cabinets here)
Monday, January 27, 2014
How I Upcycled a Sweater into a Valentines Day Wreath

I had a white sweater that I was going to wear on Sunday
and when I put it on, I noticed there was a gaping hole right under the turtleneck.
I don't know how it got there and I hope it wasn't there the last time I wore it.
Thursday, January 9, 2014
Horseshoes and a Chunk of Wood get a New Life

Wednesday, January 1, 2014
Tiered Caddy from Baking Pans and Wood Candle Holders

Wednesday, December 18, 2013
Old Pickle Jars into Pottery Barn Knockoffs

Thursday, July 18, 2013
Quick Vintage Pie Tin and Wood Spool Makeover
I just love the combination of metal with wood.

I have used vintage pie tins and old wooden textile spools in our cabin for decor.
The pie tins are hung on the rafter beam above the logs in our kitchen and the spools are used as pillar candle holders on our mantle.
I had one pan and a couple of textile spools I wasn't using so I decided to make them into a pedestal dish.


In order to stabilize the pedestal more I added a round wood base to the bottom of the spool. This piece was another leftover from a glass dome that had been broken.

To securely attach the pieces together my husband helped me drill a hole in the center of the wood base the same size as the hole running through the center of the spool. We slid a wood dowel through the spool and into the base using wood glue to secure it. Clamped it for the night and walked away. The next day we drilled a small hole in the center of the pie tin and used a nail to secure it into the wood dowel in the center of the spool. We also added a little more glue between the tin and spool.

As you can see, the tin has great graphics and the nailhead barely shows in the middle.
I've used this to display handmade soaps...

... it could be used as a fruit bowl, candle holder, or add a glass dome to it to use as a dessert stand or make a few in different heights to add some interest to a food buffet at your next party!
What would you use it for?
'til next time,
Adina
Linking to:
Friday, July 5, 2013
Old fence boards turned into Fruit Stand Signs
What's a girl to do when her neighbors fence boards are falling off?
Sneak over and rescue them of course.
It seemed like weeks that I drove past these fence boards lying on the ground before I decided to pull over and "clean them up" for a neighbor. Now I have a small pile of perfectly weathered red boards.

While driving past these boards I had been thinking about what I could do with them and I felt inspired to make a couple Fruit Stand / Farmers Market type signs.
What fruit?
Strawberries and Cherries seemed to fit the red color on the boards.
So, I found a font I liked and printed the word STRAWBERRIES. It took four pieces of paper to fit the size font that I wanted.
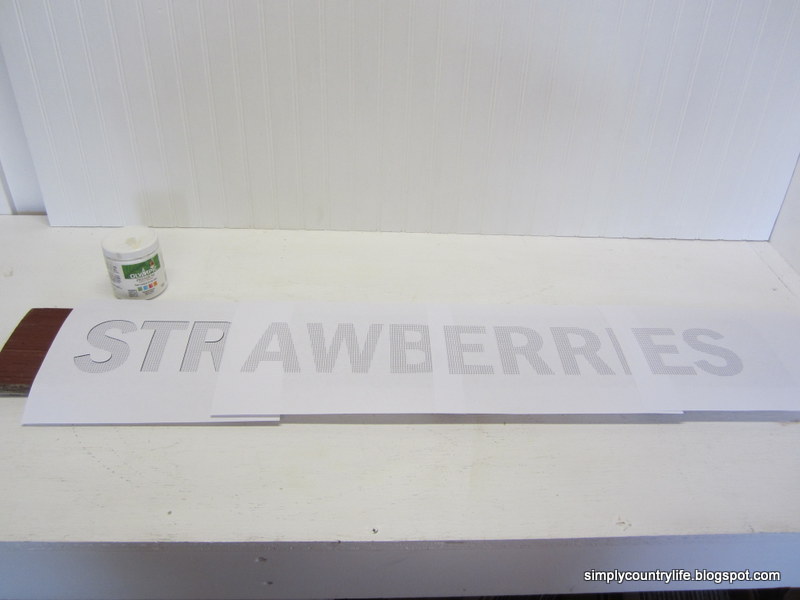
I taped the backs of the paper together to keep the letters aligned.
First, with the letters face up on the paper, I tried to trace them really hard with a pencil to make an indentation outline of each letter, but the wood was too hard and it wasn't making any marks.
Next try - I colored the entire back side of the letters with chalk and then placed the chalk side down on the board, with the letter side up and traced the letters again. This time the chalk left an outline on the wood.

Using a permanent Sharpie marker I traced the chalk outline of each letter and then handpainted inside of the black outline with white paint.

A quick sanding to distress the letters, a clear matte finish sprayed on the sign and two eyelet hooks added to the top and my first sign was all done!

I repeated the same process to make the CHERRIES sign except I wrapped rusty wire around each end to hang it with, rather than the eyelet hooks.

I have a couple of these boards left, but haven't decided what to do with them yet.
Any suggestions?
'til next time,
Adina
Linking to:
Monday, April 30, 2012
Tin Pie Pan Makeover
Another Monday Mini Makeover
Tin pie plate repurposed into wall art

I found this pie plate at a goodwill for $1 and loved the scalloped edging and the fact that it is a little rusty and well used. This one was going home with me and I already had an idea of what I wanted to do with it.

I was hoping to find a more vibrant vintage pie image, but to no avail. Then I stumbled across a picture of a vintage ceramic pie plate with a strawberry pie recipe on it and decided to print a copy of the picture and cut out the center of it. I preceded to coat the back of the image with mod podge and center it on the bottom of the pie plate. After smoothing out all of the air bubbles and letting it dry for about 15 minutes I coated the front of the image with mod podge to seal it. It just so happened that the recipe image portion of the picture fit the center of the pie pan perfectly!
Don't you just love it when a plan comes together?


There was already a small hole on the edge of the pie pan, so I cut a strip of cream colored duck cloth fabric and tied a metal ring to the pie pan to hang it with and made a simple bow with the remaining fabric.


A quick, easy and inexpensive way to recycle a pie plate.

I'm already on the hunt for another one. I'm thinking chalkboard paint on the center of the next one. What do you think?
'til next time,
Adina
Linking to:


Subscribe to:
Posts (Atom)