

Showing posts with label frame. Show all posts
Showing posts with label frame. Show all posts
Sunday, December 1, 2013
Burlap and a Dollar Tree Ornament
Thursday, October 24, 2013
Rustic Wood Framed Faux Winter Chalkboard
Brrr

I had been given this rustic wood frame back in the summer and have held onto it until now.
I love that it has the bark left on the outer edges.

Chalkboards are super "IN" right now and I have yet to create one, but it is on my list of projects. You know that list, the one that never seems to end.
Monday, September 10, 2012
Upcycled Ornate Frame into a Unique Clock
These vintage metal frames, Made in Italy, turn up every so often at thrift stores and I always seem to scoop them up. Sometimes they have glass or a mirror and sometimes they don't. This guy didn't have anything in the frame other than the original backing. I debated what to do with it. They are popular enough just left empty, but while I was taking the backing out of the frame, it hit me to cover it in burlap. My first thought was to paint a word or silhouette on the burlap and then, I thought, what about a clock?

Why not a clock, so here goes my creative process on this one.
The first thing I did was trace the backing of the frame onto burlap, cut the burlap oval out and glue it onto the backing with craft spray adhesive.


Then I moved onto the frame. I sanded and cleaned it so I could paint it.

Well, as you can see, first I painted it white. The white didn't contrast enough with the burlap, so then I painted it black and forgot to take a pic.

Then I made a quick trip to Hobby Lobby to buy the numbers and the clock mechanism.
My wonderful husband drilled a hole in the middle of the burlap covered backing for me while I spray painted the clock numbers, hands and bolts black. (They were gold).


Once everything was dry, it was time to glue the numbers into their places and assemble the clock mechanism and hands according to the directions on the package.


I placed the required AA battery into the clock and it works!!!
Well, there you have it, my upcycled clock!

I have 3 additional frames like this in different sizes, any ideas on what to do with them?
Let me know what you think.
'til next time,
Adina
Linking to:
Monday, May 14, 2012
Burlap & Wood Love Frame Collage
I've been imagining this one for a while now and am happy to be able to finally show it off! The inspiration came from all of the different collage frames and frame gallery walls that seem to be everywhere lately.

After a trip to Goodwill and $4 later I was well on my way to starting my frame collage.

I had black primer and black spray paint on hand already, so I gave the mismatched frames a couple coats of each.


Much to my dismay, when I asked my husband for help gluing the frames together, he told me I should've glued them before painting them. Apparently wood glue doesn't adhere to paint very well. I had to sand the paint off of the edges of the frames before I glued them together. Once I finished sanding the edges, I just needed to come up with a design and glue them together. He was kind enough to let me borrow his wood glue and his clamps.


Two days later I removed the clamps and used a small brad nail gun to shoot small nails through the portions of the frames that were glued, just as an extra step to make sure that the collage was good and sturdy. I had to spray paint them again to cover the edges that I had sanded.
In the meantime, while the frames were drying, I cut pieces of scrap burlap to fit the cardboard backs of four of the frames and glued the burlap onto the cardboard with spray adhesive.


Now I have a secure frame collage and burlap pieces for the four frames that I want to spell LOVE and two empty frames for pictures.

I decided to find a font online and print the letters LOVE on a manilla file to create my own stencils.


I cut the letters out of the manilla files with an exacto knife and painted the letters on the burlap cardboard pieces with black acrylic paint and a sponge brush. Now all I had to do was wait for the black paint to dry on the burlap, attach a sawtooth hanger on the collage, clean the glass pieces, print two pictures and put the frames back together.


The entire collage measures 27" across and 20" tall. There are four 5x7 frames and one 4x6 frame. The total out of pocket cost was $4.


I already have frames to make another one with the word FAMILY. I'm debating using vinyl letters directly on the glass without the cardboard backing. Tons of possibilities with this one. You can even use an already made frame collage to save time. I've seen them at Old Time Pottery and Wal-mart for as low as $10. I've thought about using scrapbook paper with solid color letters over it in the frames as well, with color coordinated paint on the frames to match the scrapbook paper.
Let me know what you think.
'til next time,
Adina
Linking to


Metamorphosis Monday at betweennapsontheporch.blogspot.com
uncommonly-yours-link-party-28 at Uncommon Designs
uncommonly-yours-link-party-28 at Uncommon Designs

Friday, February 17, 2012
Old Window Frame
I love old windows and fell in love with this little one when I found it a few months ago. I had visions of it painted a chippy white with the dark green peeking through in spots with a vintagey, is that a word - vintagey, print of a bird or nest or something like that.

However, today I found a sweet old wooden frame that was falling apart, but, it had a fabulous vintage floral print in it. PERFECT!!! I couldn't wait to get home and pull this old window out and replace the print. I even love the green paint with it, so I decided not to paint the window after all.

Part of the charm of this old window is the handle on the bottom and part of the lock still on the top.

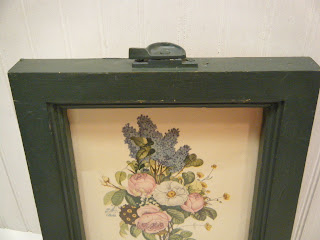


Probably the easiest before and after project ever!
'til next time,
Adina
Subscribe to:
Posts (Atom)