

Showing posts with label farmhouse decor. Show all posts
Showing posts with label farmhouse decor. Show all posts
Thursday, July 16, 2015
Farmhouse Caddy Built Around a Salvaged Spindle
Monday, June 29, 2015
Garage Sale Frame Chalkboard Makeover

Saturday, June 20, 2015
Lazy Susan Grain Sack Makeover

Monday, November 17, 2014
Old Porch Post Repurposed into Coat Rack

Thursday, October 30, 2014
Cabinet Door Repurposed into Mason Jar Wall Vase

Friday, August 15, 2014
A New Look for Vintage Farmhouse Pictures

Thursday, July 17, 2014
Handmade Farmhouse Signs

Thursday, June 19, 2014
Dirty White Cabinet gets a Fresh New Farmhouse Look

Tuesday, August 13, 2013
Plain Wood Serving Tray turned Shabby Farmhouse Decor
I'm definitely liking the end results of transferring images onto wood, plus it's quick and easy.
Here's another Goodwill makeover that I worked on this week using wax paper to transfer a Farm Fresh Milk Cow image onto a plain wood serving tray. I purchased the image from an Etsy shop called Graphic Marketplace. You can check them out HERE.


As you can see, the tray got a new coat of paint, after a thorough cleaning and sanding. I lightly distressed the edges of the tray to give it a shabby look and then transferred the image onto it. Lastly, I sprayed the tray with a clear matte sealer to help protect it.
If you want to see another transformation that I did using one of their graphics go HERE.


Here's another Goodwill makeover that I worked on this week using wax paper to transfer a Farm Fresh Milk Cow image onto a plain wood serving tray. I purchased the image from an Etsy shop called Graphic Marketplace. You can check them out HERE.
Before

After

As you can see, the tray got a new coat of paint, after a thorough cleaning and sanding. I lightly distressed the edges of the tray to give it a shabby look and then transferred the image onto it. Lastly, I sprayed the tray with a clear matte sealer to help protect it.
If you want to see another transformation that I did using one of their graphics go HERE.

If you would like to find out how I easily transferred the image onto the wood tray using wax paper, click HERE. This will take you to another post that links to the steps to do it, along with numerous other methods that you can use.
Here's a closer picture of the image on the tray.

I did lightly color it in with a black colored pencil just to darken it a bit.
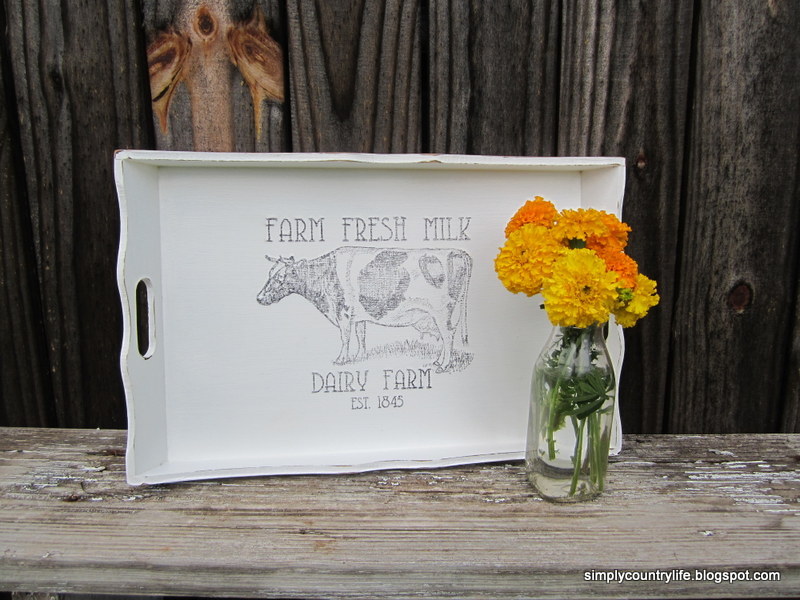
I already have another project started using this method, again, that I'll be posting about soon. If you'd like to see a cheese box that I madeover similar to this tray click HERE.

Thanks for stopping by to take a peek at my makeover.
'til next time,
Adina
Linking to:
Tuesday, July 9, 2013
I just couldn't part with this old crate
My mom brought me an old fruit crate that she found during a trip to Connecticut. I loved the age and rustic appeal that it had, but I couldn't imagine it working in a practical way as a crate. The sides and bottom were made from thin boards and some of those boards were split, but I just couldn't part with the crate. So, I began carefully taking it apart.

I had intentions of using the two ends to make signs out of. They were made from thicker boards and had a trim piece of wood at the top and bottom. They had old nails holding them together and a lot of rustic charm.

The first sign I wanted to make was going to say FARM FRESH. I found a simple font and printed the letters out on paper in the size that I wanted to use as a template.

The next step was to color the back of the letters with chalk.

Then placing the paper with the chalk side down and the letters facing up, I traced each letter with a pencil to make a chalk outline on the wood.

I painted the letters with white paint and outlined them with a permanent black sharpie marker.

I sanded the paint a little to distress it and sprayed a clear matte finish over it to protect it. Then I added two eyelets to the top so that I could attach rusty wire to use as a hanger and then...
...more inspiration hit!
Remember the thin boards from the bottom of the crate that were splitting?
I decided to cut 3 smaller signs from them to hang from this sign.

Using the same chalk, trace and paint technique, I made signs saying EGGS, DAIRY and PRODUCE.

While I was cutting the smaller signs I also drilled small holes on the top and bottom of each end of each sign. I wanted to run rusty wire through them to hang them on the FARM FRESH sign. I also attached two eyelets to the bottom of the FARM FRESH sign and started weaving the wire through each sign.

Once the wire was ran through each sign and attached to the main part - this sign was finished!

I only wish I had space to hang it in my own home. I love how it turned out and that I was able to use the crate!
Here's what I did with the other end of the crate.

There are a few small pieces of the sides of the crate left. Maybe inspiration will hit me at some point and I'll have the perfect project to use them on.
'til next time,
Adina
Linking to:

Subscribe to:
Posts (Atom)